Table of Contents
- Overview
- Glossary
- Installation
- Tutorials
- License Operations
- Scenario Steps
- Advanced
- Application
- Screen Data
- Verification
- Clipboard
- Comparison
- Culture
- Data Source
- Date Time
- Driver
- Excel
- FTP
- File
- Flow Control
- Folder
- Format and Conversion
- Keyboard
- Loops
- Math
- Random
- Regex
- Screen
- System
- Text
- User Interface
- Windows Account Information
- Expression Development
- Embedded Development Environment
- Voodoo Connect
- Cross-Browser Scripting (CBS)
- Chrome Extension
- Firefox Extension
- Notification Center
- Unified Console
- Wrapper Libraries
- Database
- Troubleshooting
- 3rd Party Tool
VooDoo Beginner Training
What Will You Learn in This Training?
In this training, you will have the opportunity to learn step by step how to effectively use the basic components of VooDoo RPA tools along with their parameters, record screens, create projects from the welcome screen, and explore other related applications.
Tools to Be Used in This Training
-
- VooDoo Studio
- Web Browser
Creating a Project from the Welcome Screen
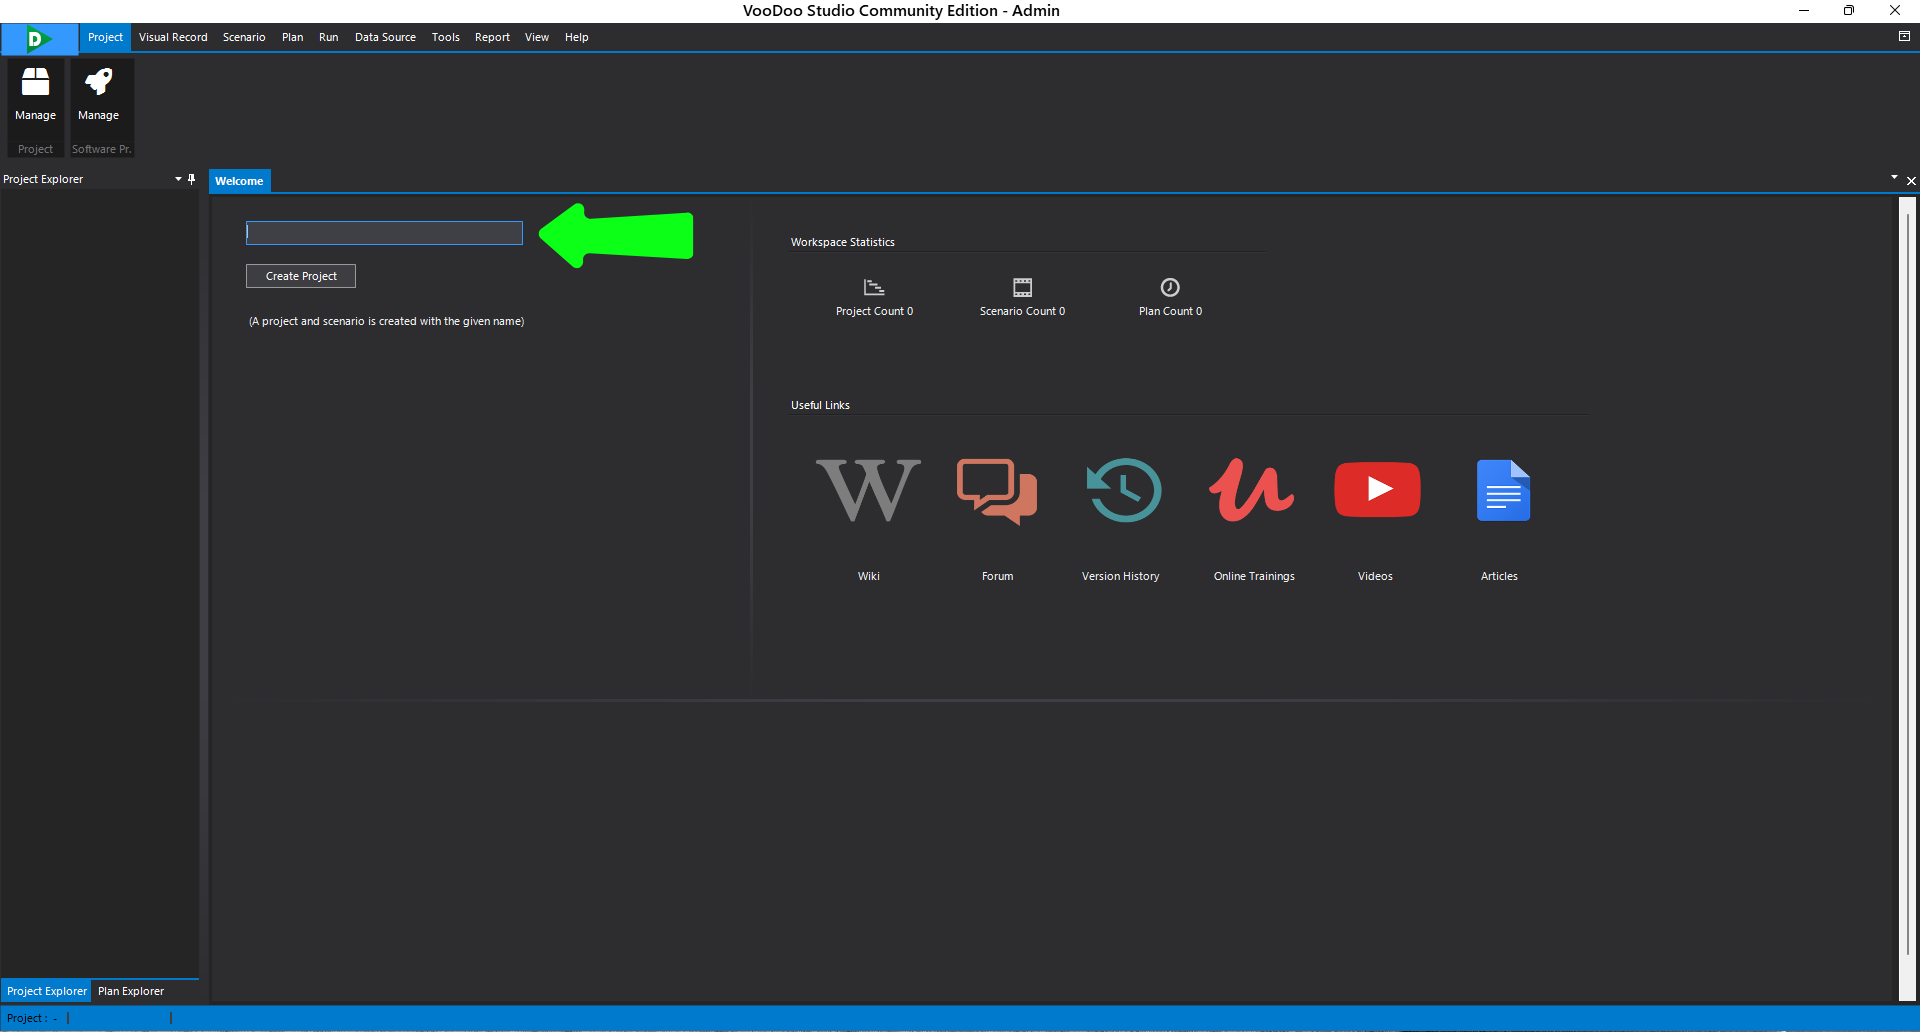
-
- First, open VooDoo Studio.
- On the Welcome screen, create a new project named “VooDoo Training”.
When we create a project on the Welcome screen, a scenario is automatically generated. Now that our project and scenario are created, let’s add a screen recording that the robot will use.
Visual Recording
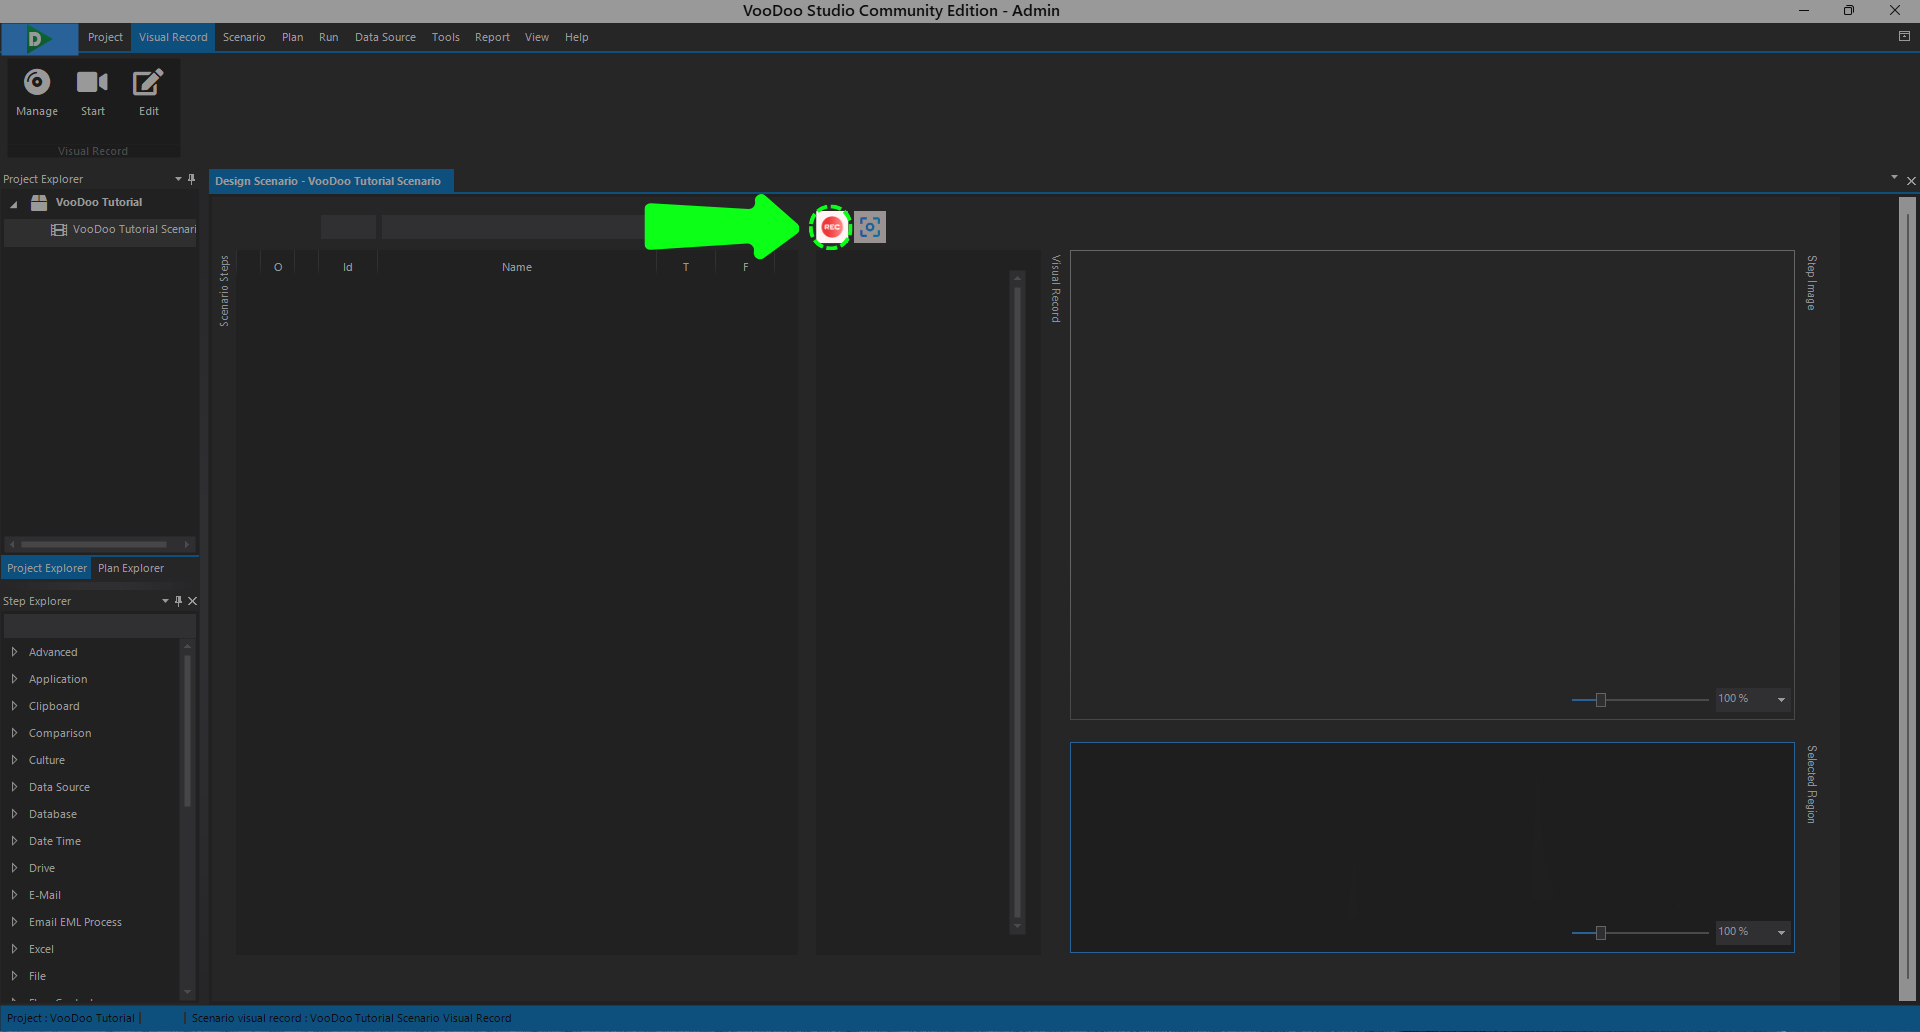
-
- Click the record button, then the studio window will minimize and after a 5-second countdown, your screen recording will start.
-
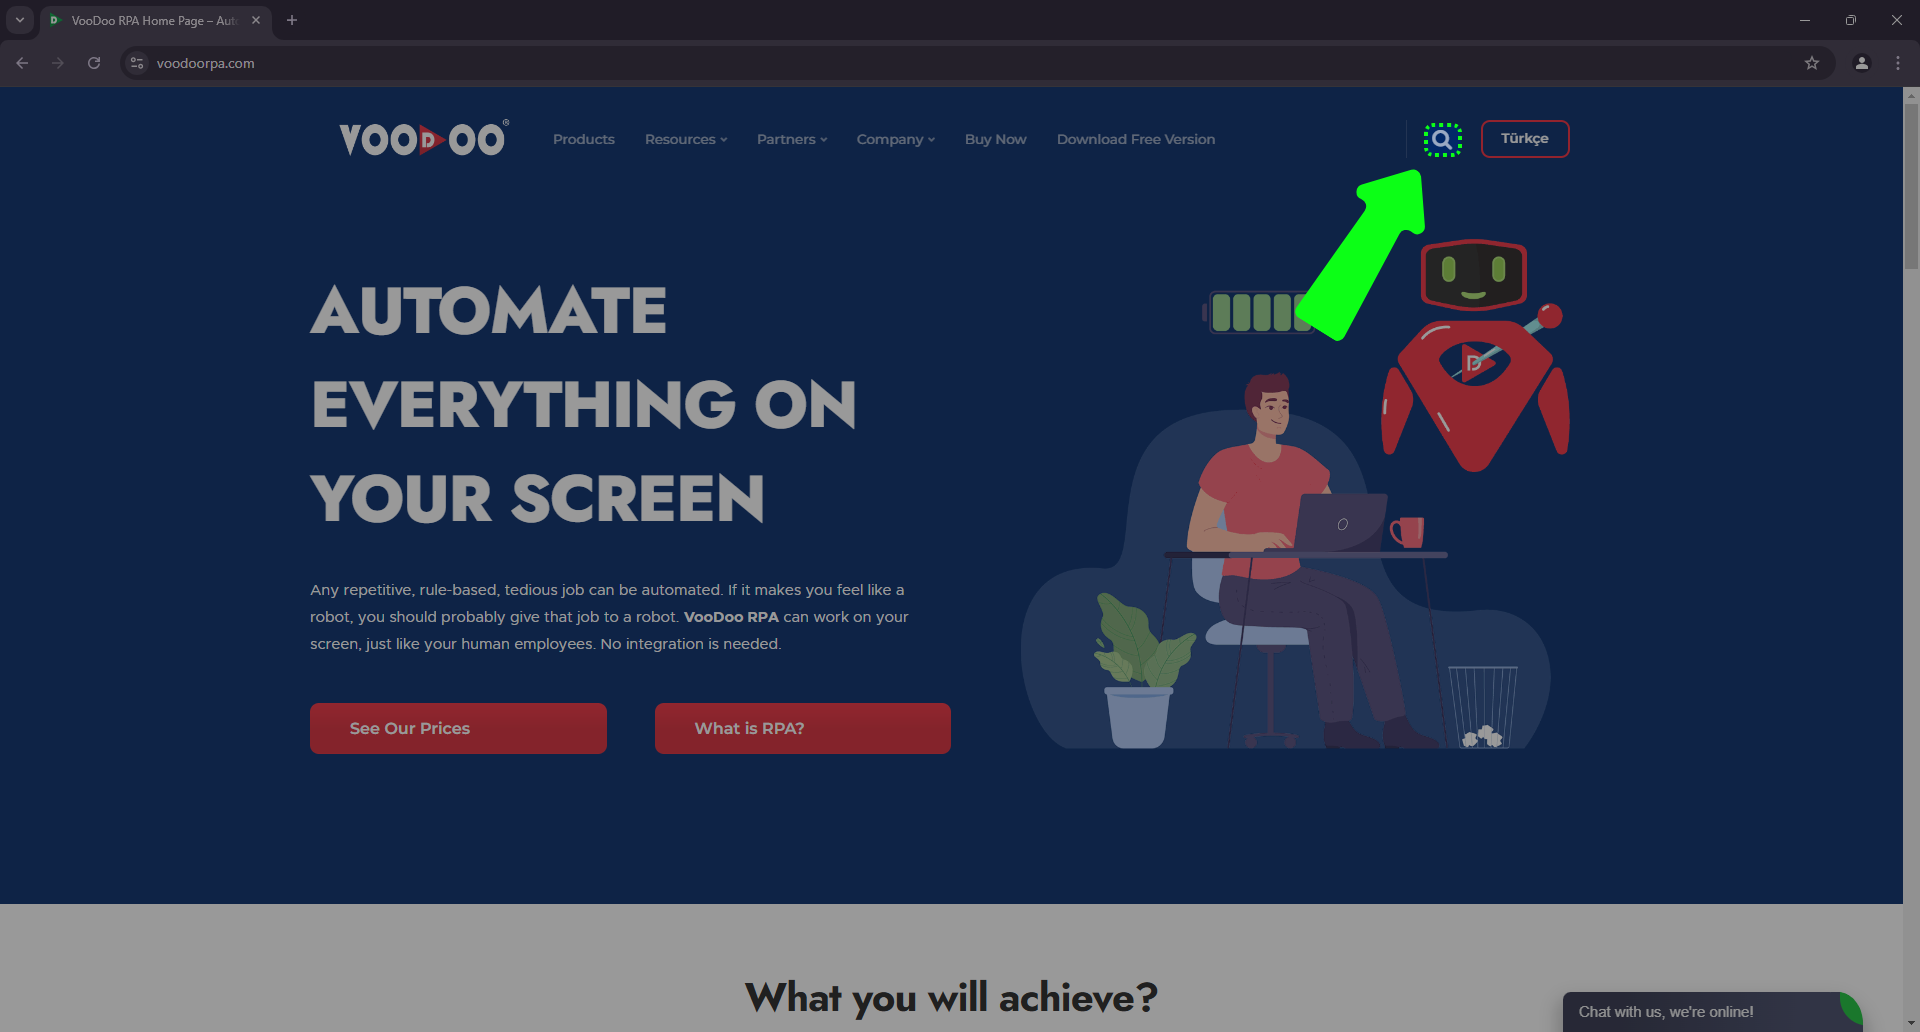
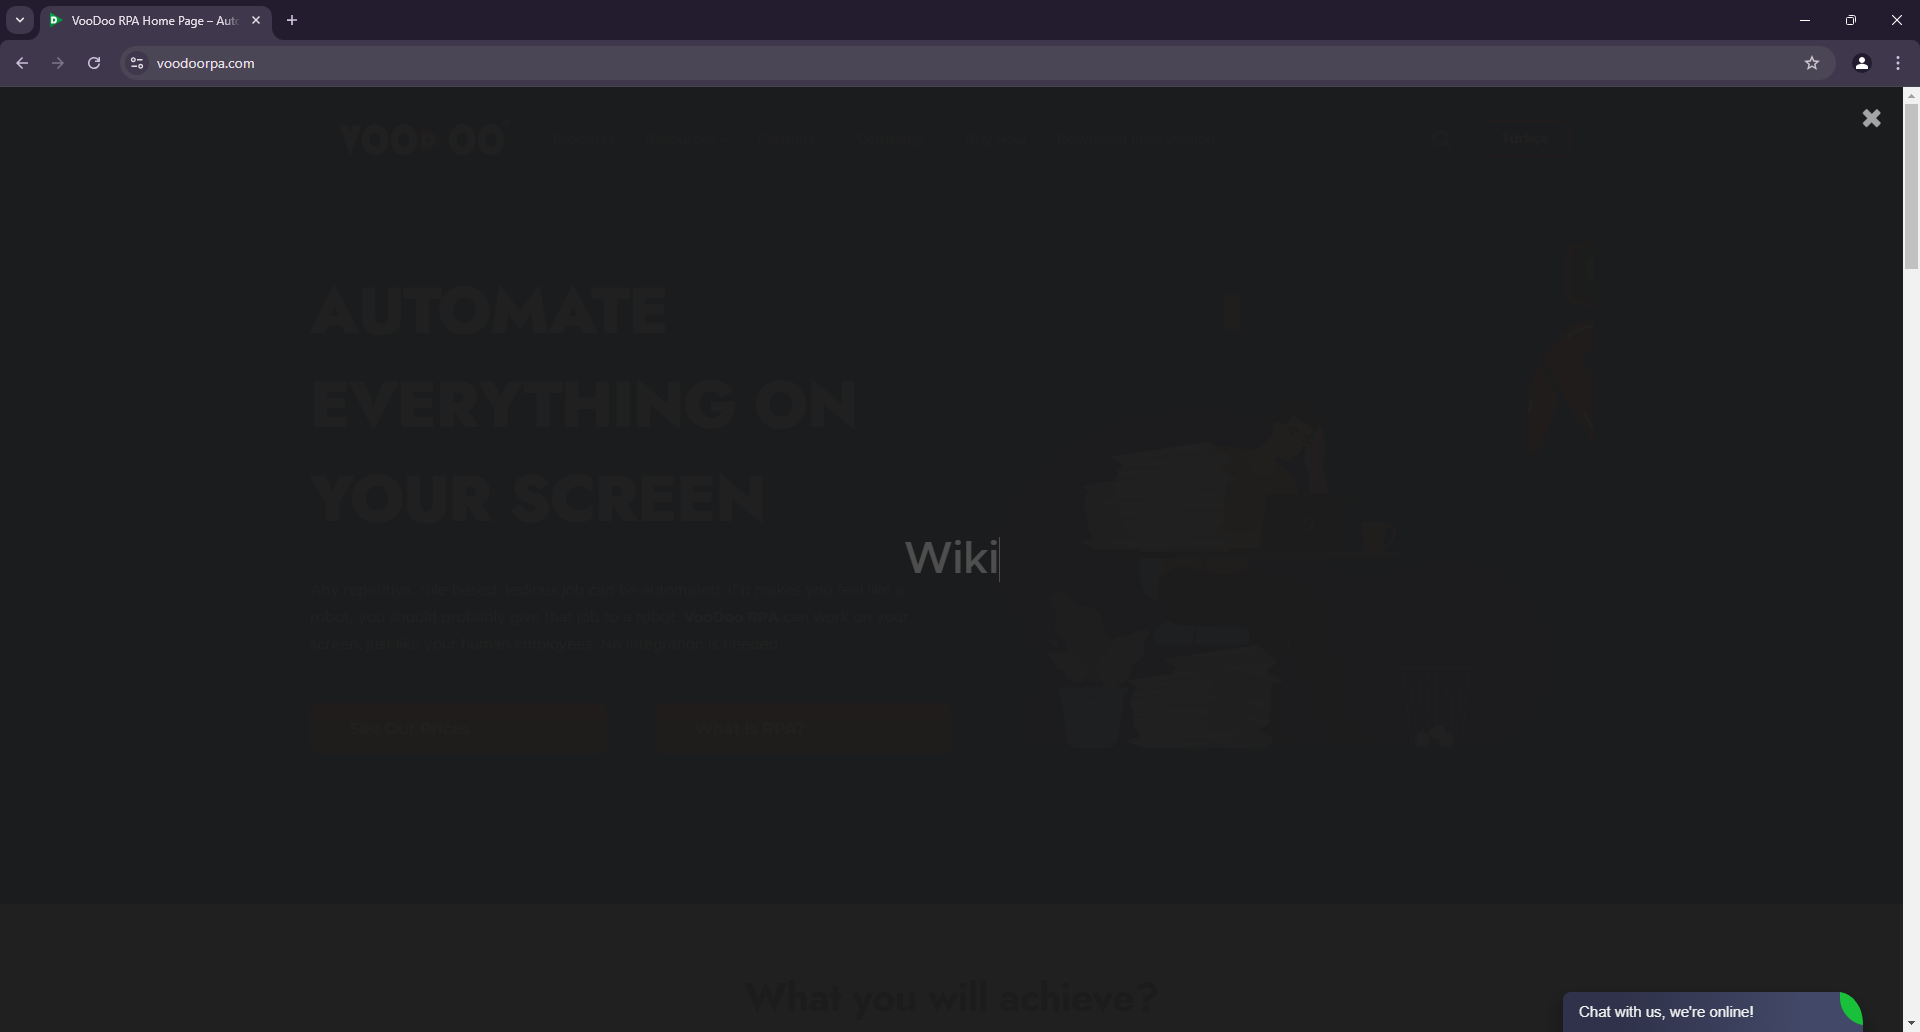
- During the screen recording, visit the VooDoo RPA website and, as shown in the first image, click the search icon, then type “wiki” in the popup window and press Enter.
-
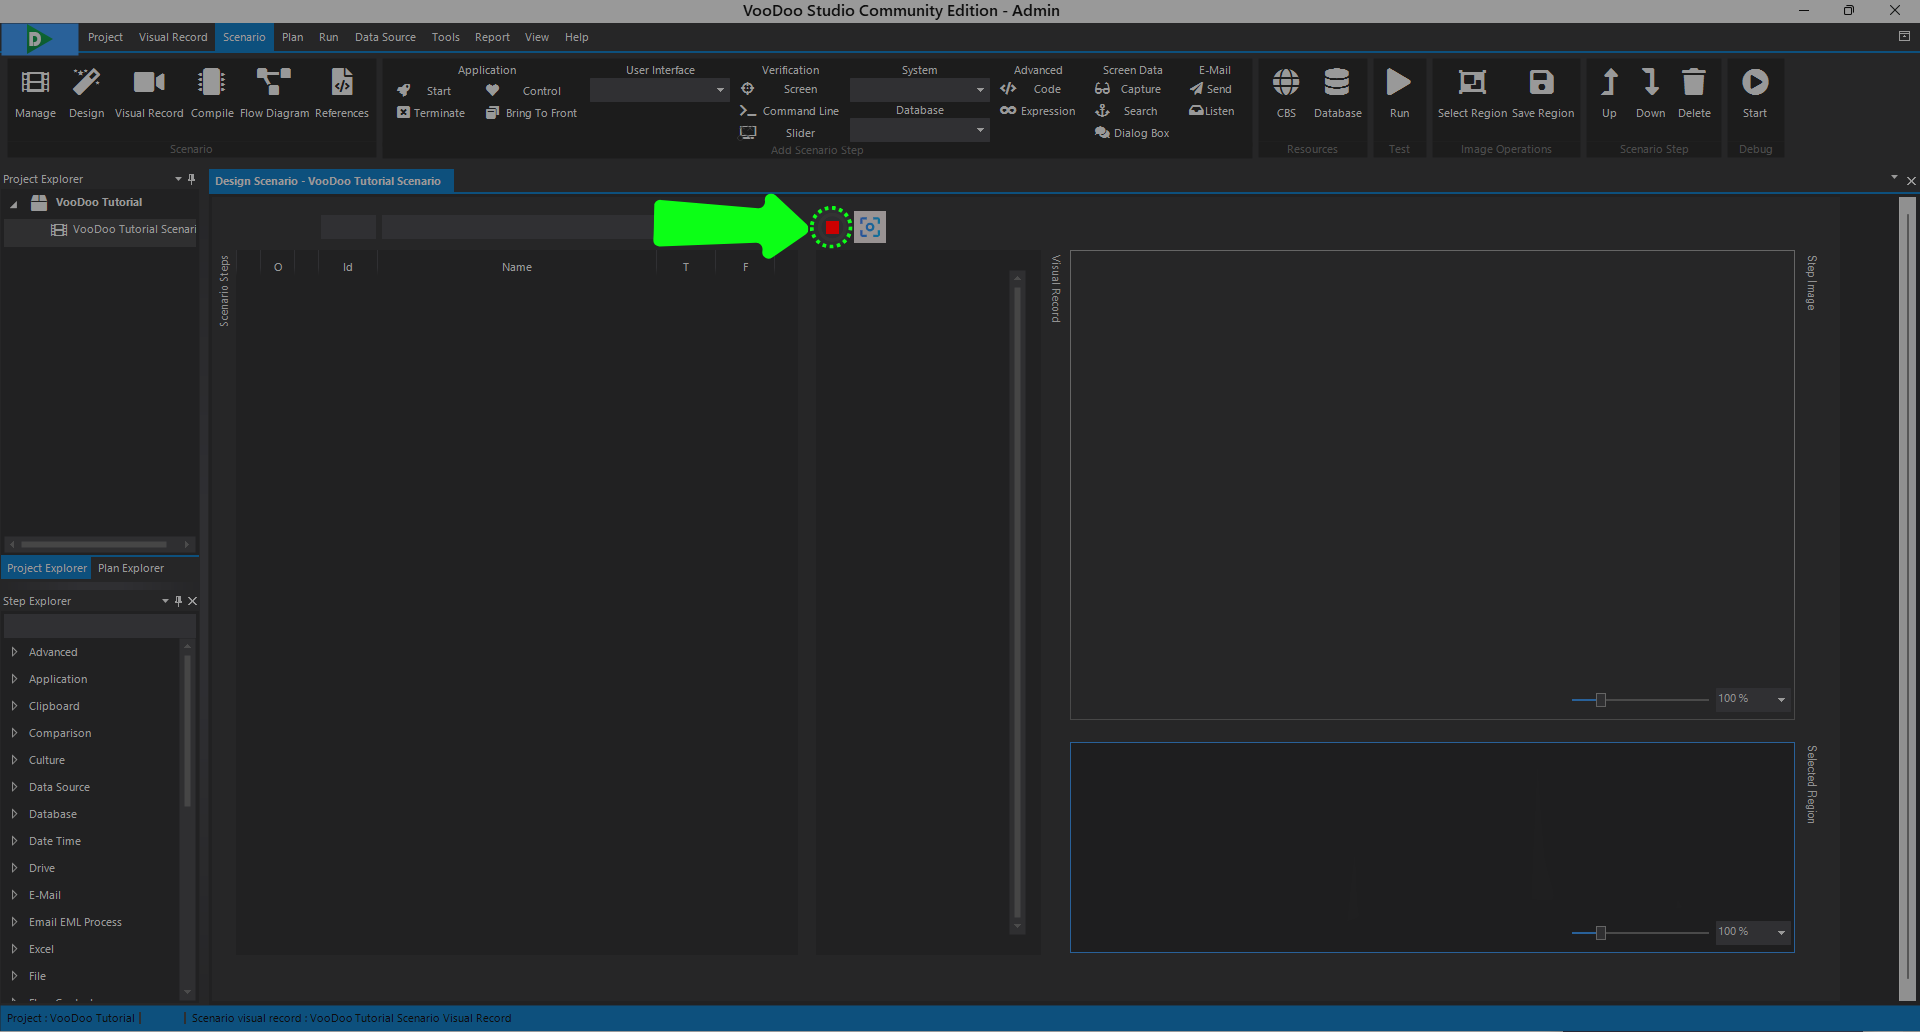
- After the recording is completed, open the studio and click the stop recording icon as shown in the image.
We clicked the record icon, visited the screens we wanted to save, and then stopped our recording. The screen recordings will automatically appear in the Visual Recording Bar in the studio.
Application Start Step
-
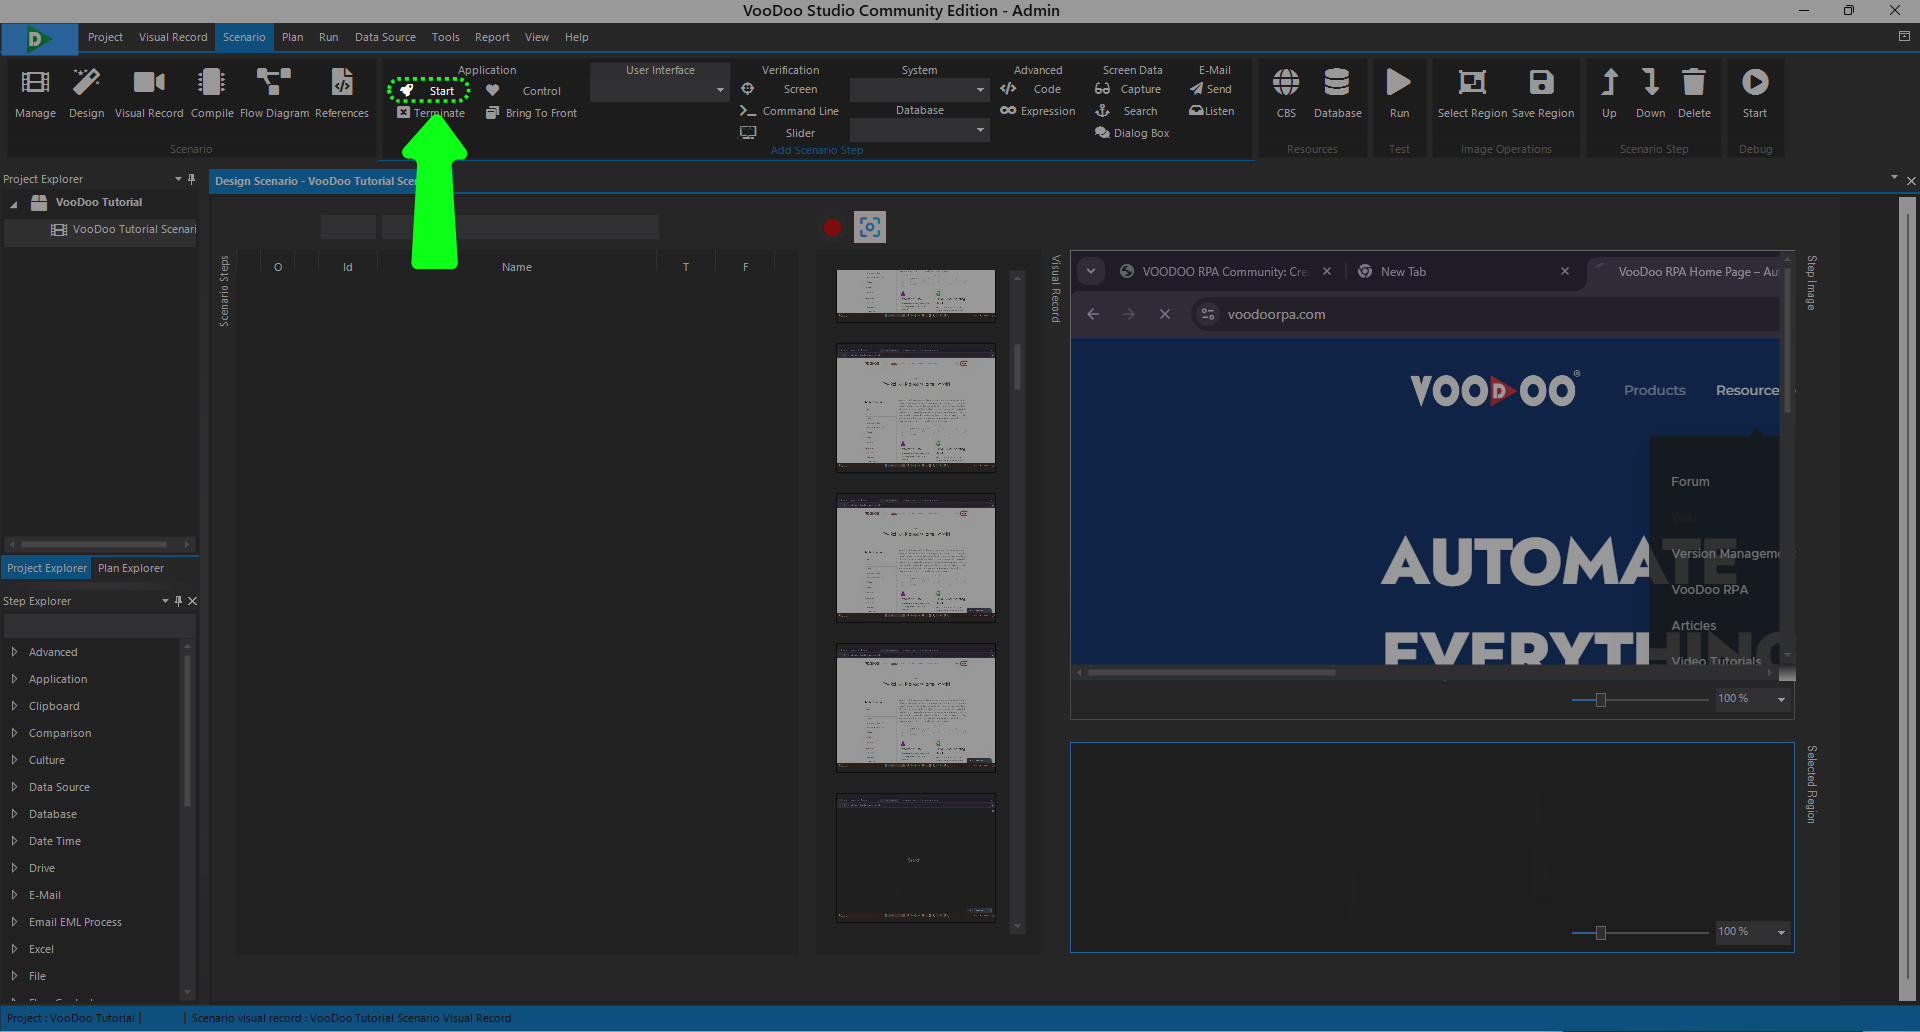
- By clicking the Start Step icon in the scenario toolbar, let’s create a start step as shown in the image.
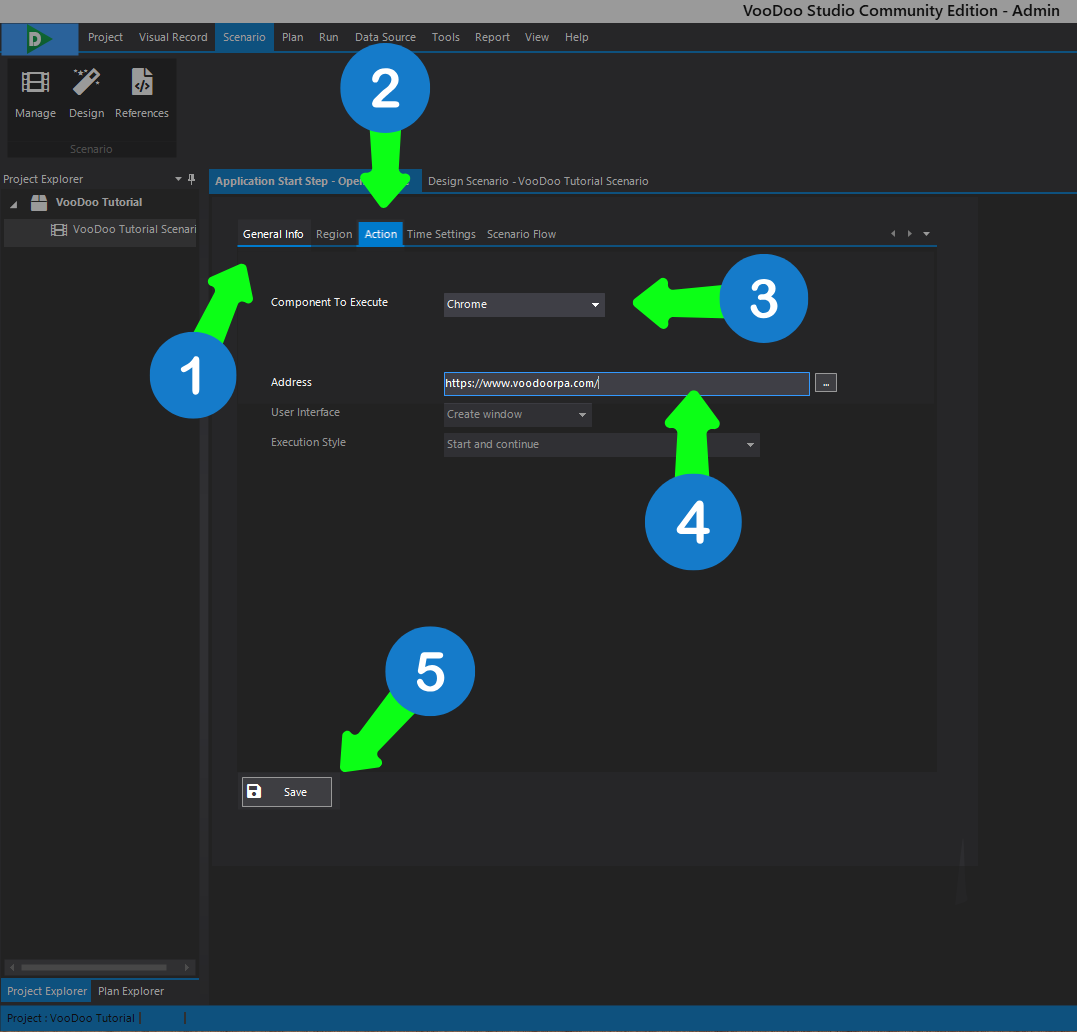
1) Name the current step using the General Information section.
2) Click on the Action option.
3) Select Chrome as the browser to be opened.
4) Enter the URL you want to visit and press Enter.
5) Save the step.
We added the application start step, which will be the robot’s first step. This step allows the robot to open the screen we want. Now, let’s add a button step so we can perform clicking actions on this screen.
Region Selection
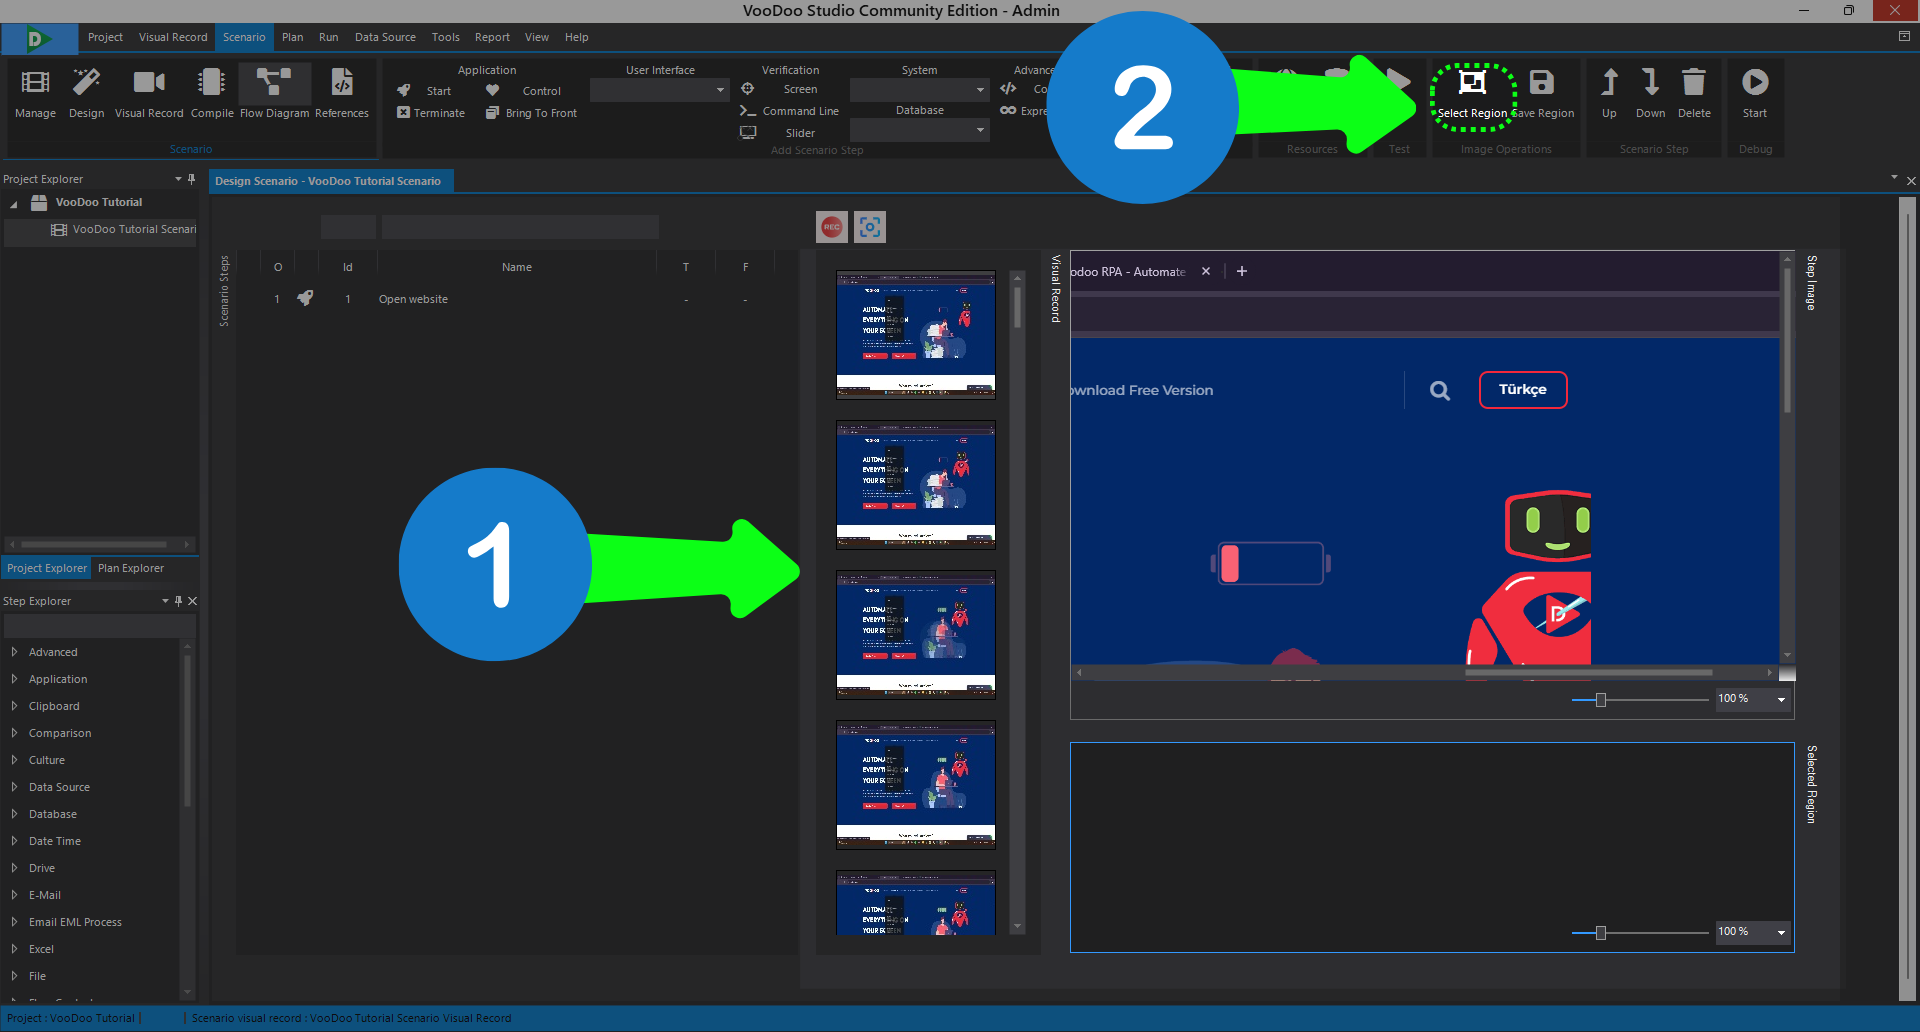
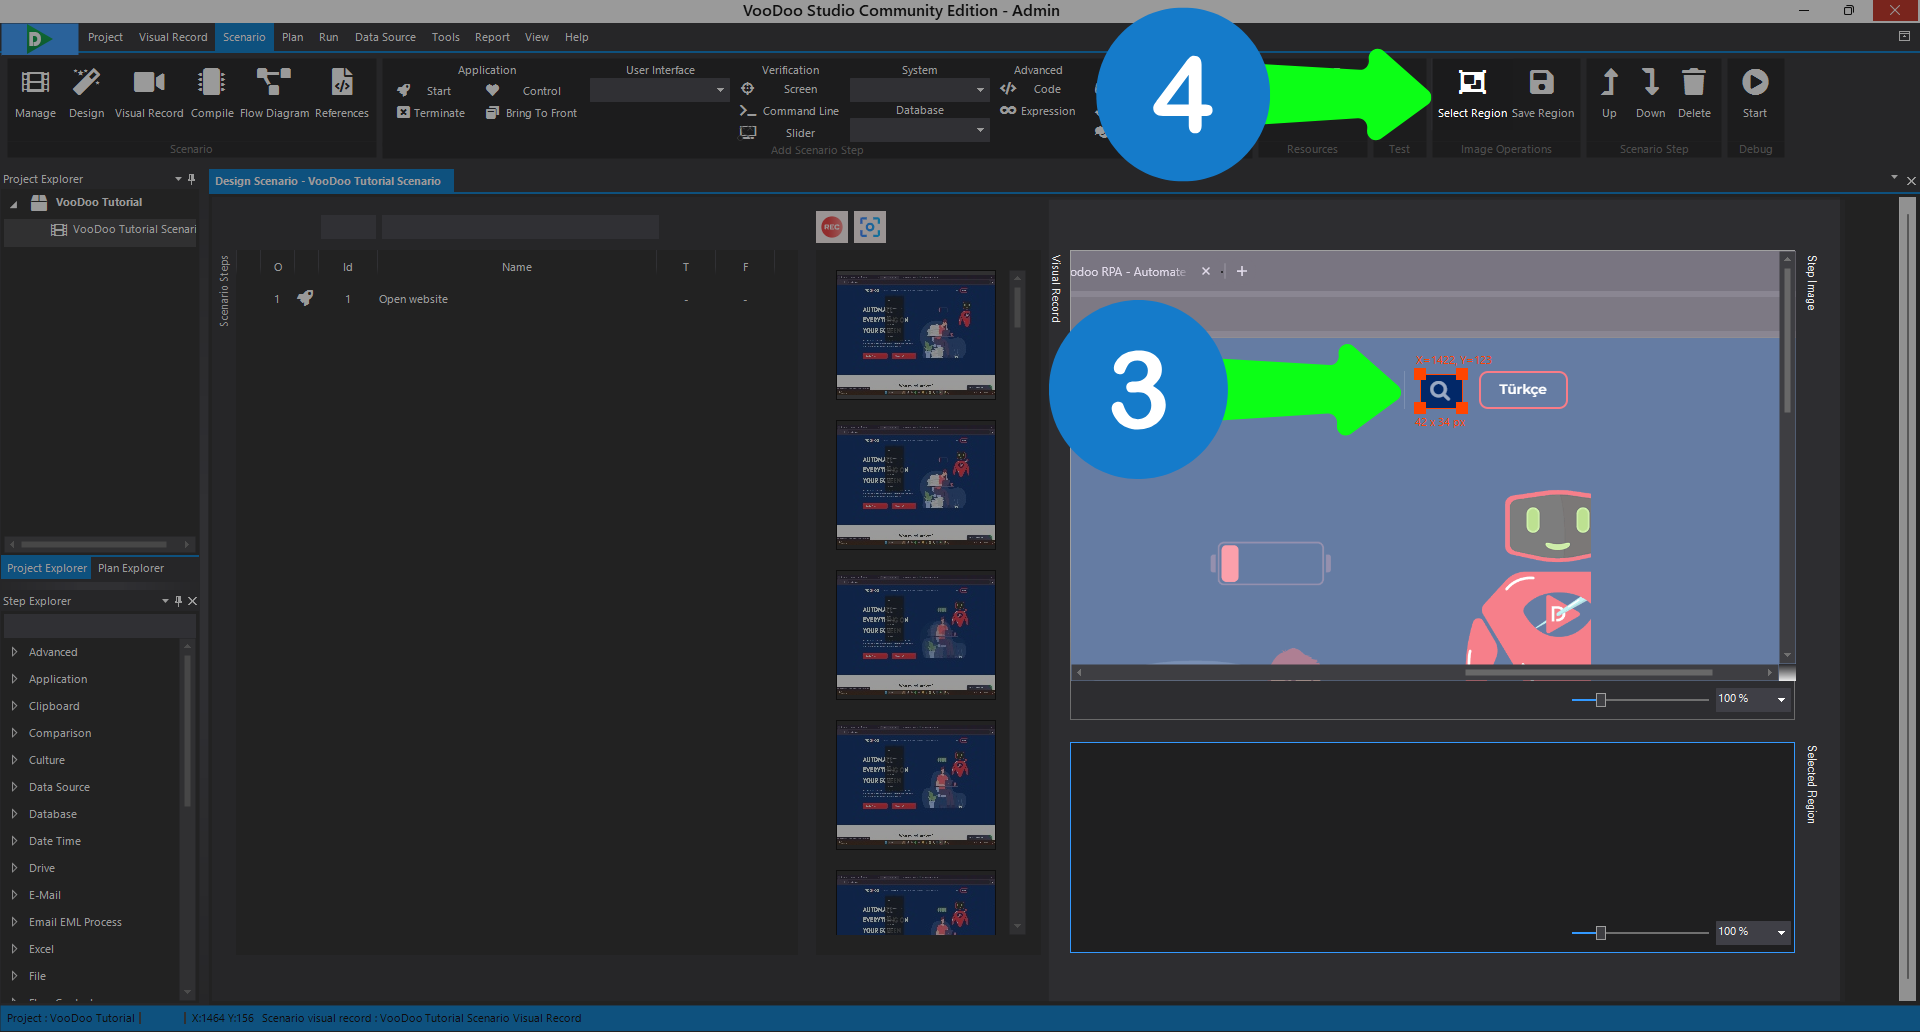
1) From the visual recording bar, select the screenshot that contains the search icon.
2) Click the “Select Region” button.
3) Crop the search icon.
4) Click the “Select Region” button again.
Since we will use a button step, we selected the region we want to click, and now we can add the button step.
Button Step
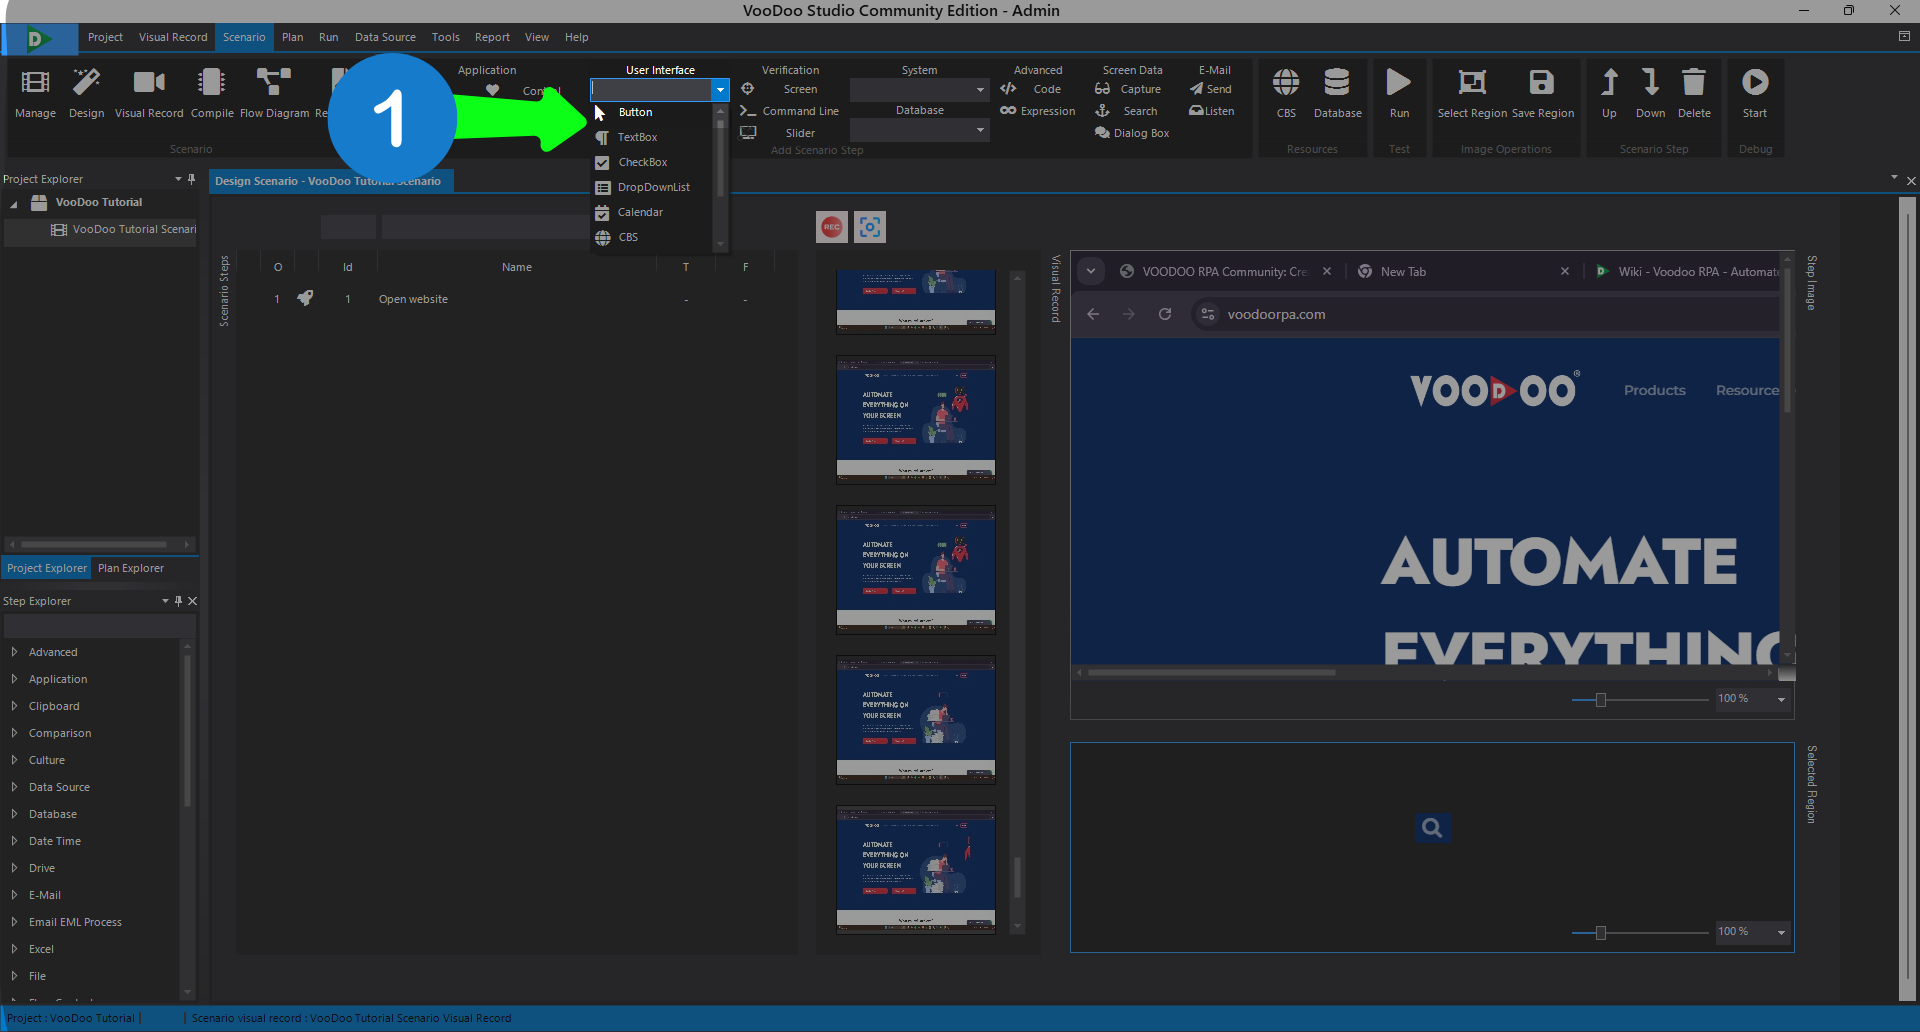
- Click on the User Interface bar in the scenario toolbar and select “Button Step” from the options.
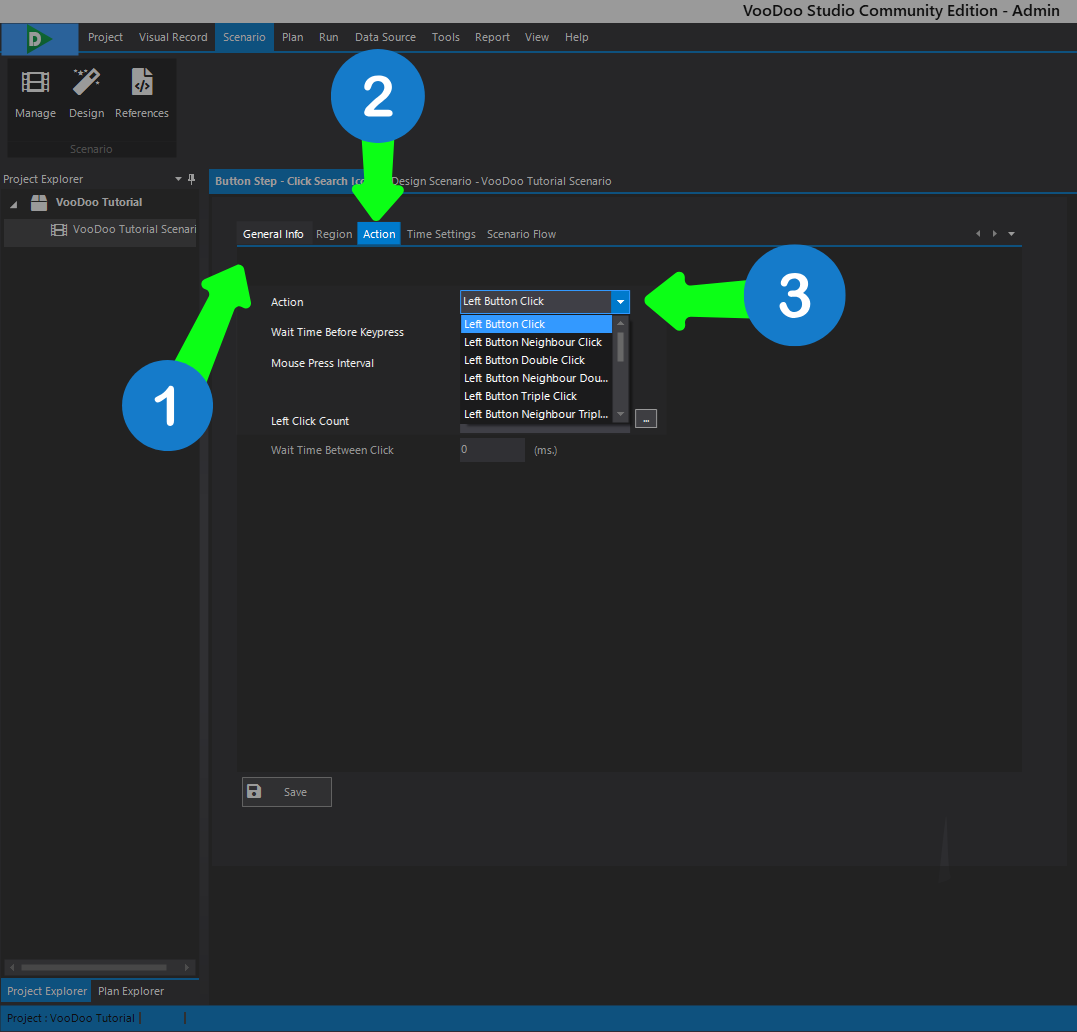
1) Name the current step using the General Information section.
2) Click on the Action option.
3) Select Left Click as the button step action.
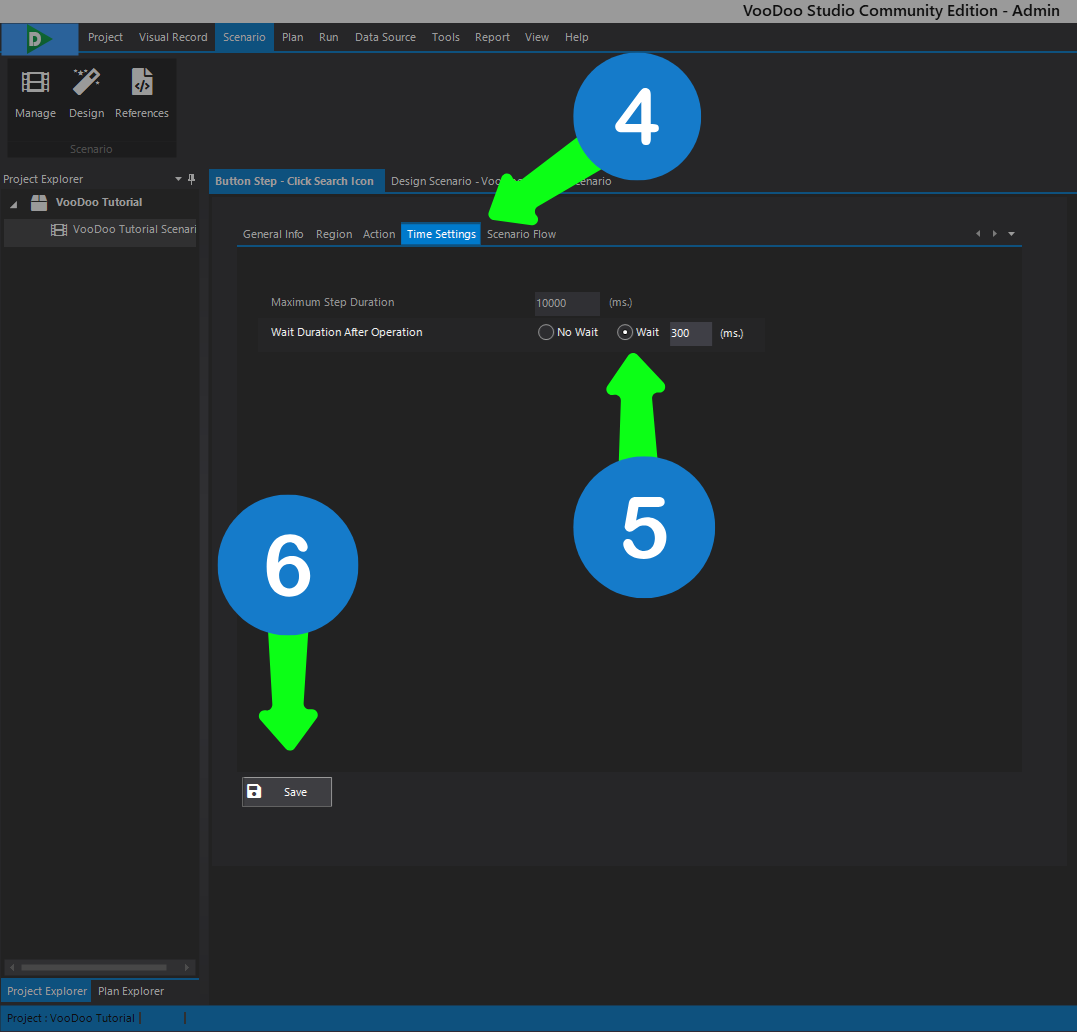
4) Click on the Time Settings option.
5) Set the post-action wait time and adjust it to 300 ms (you can choose flexible values depending on your internet speed).
6) Save.
Why is Post-Action Wait Time used?
If the page we expect to open after clicking the button step takes too long to load, we add a wait time at the end of the button step to prevent the keyboard step from losing its function.
(Alternatively, we could add a screen verification step instead.)
We created a button step to click the desired region on the screen. The robot will first run the Application Start Step to open the page we want. Then, when the button step detects the selected region, it will click there as desired. Now, let’s create a keyboard step to type ‘Wiki’ on the opened screen.
Keyboard Step
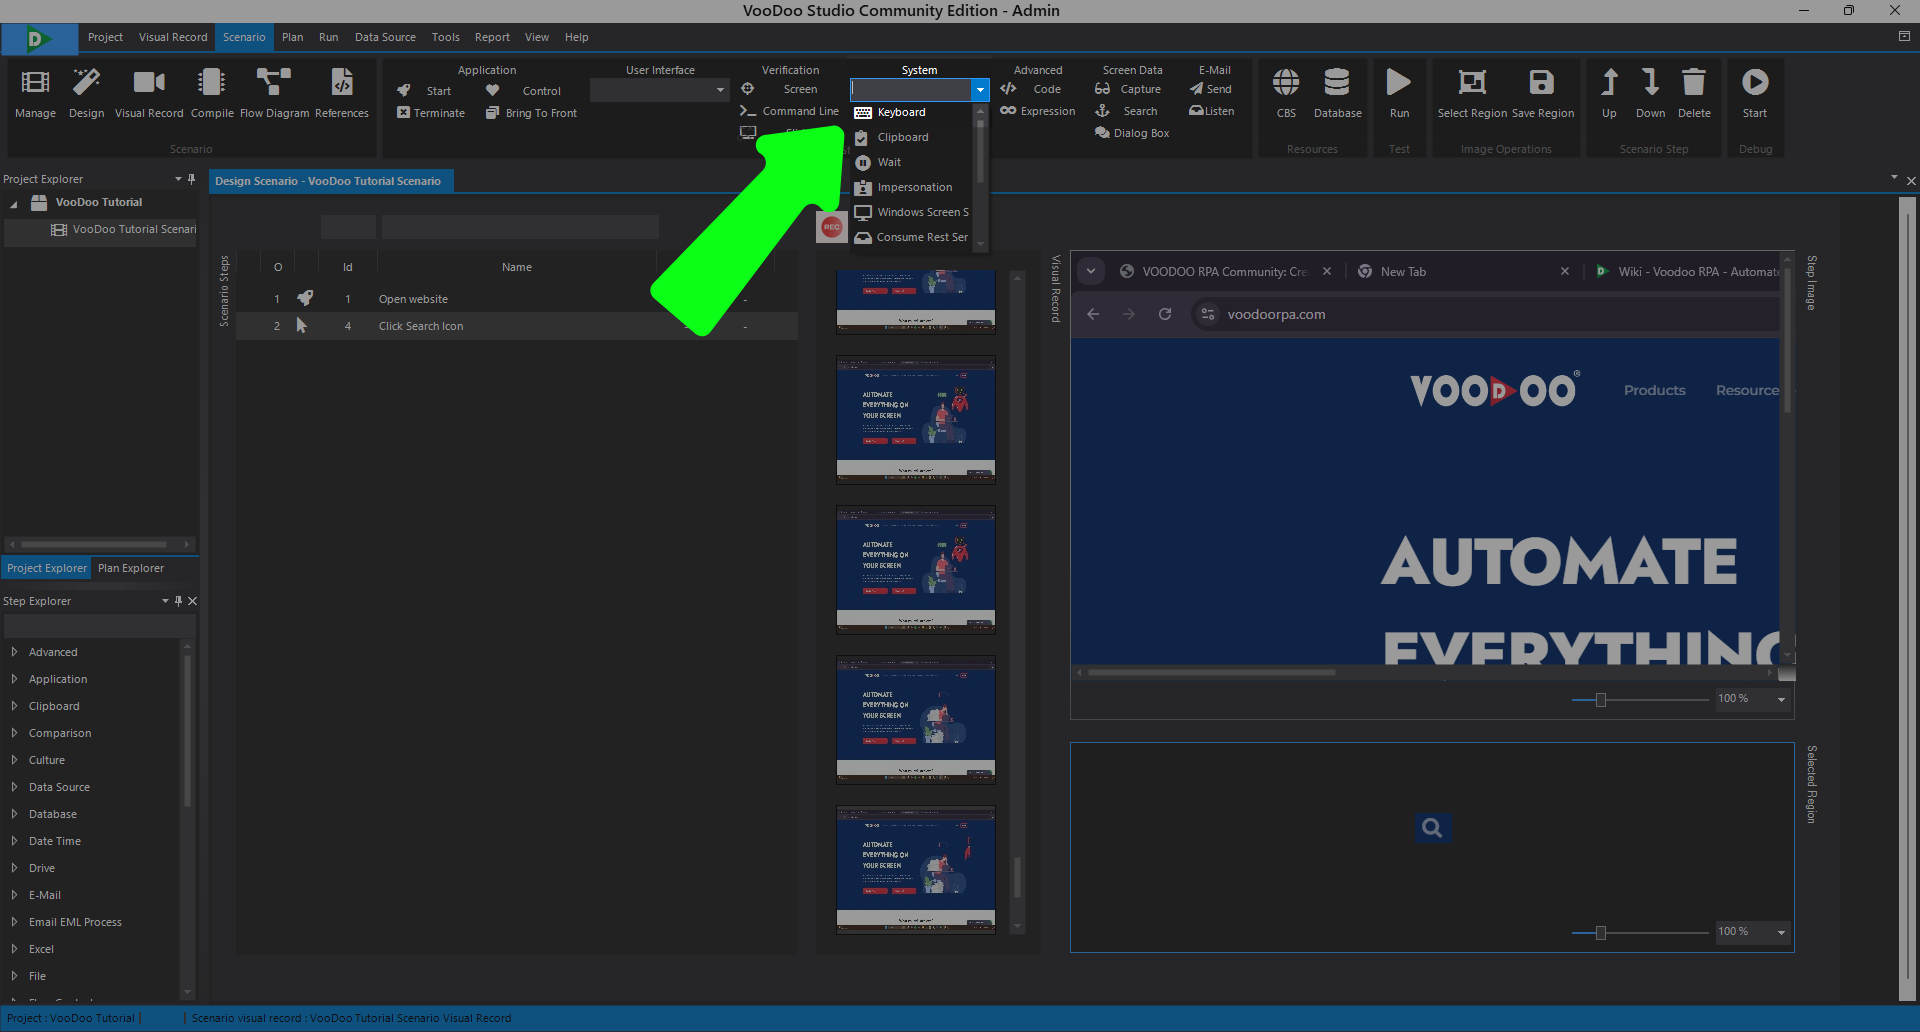
-
- Click on the System bar in the scenario toolbar and select “Keyboard Step” from the options.
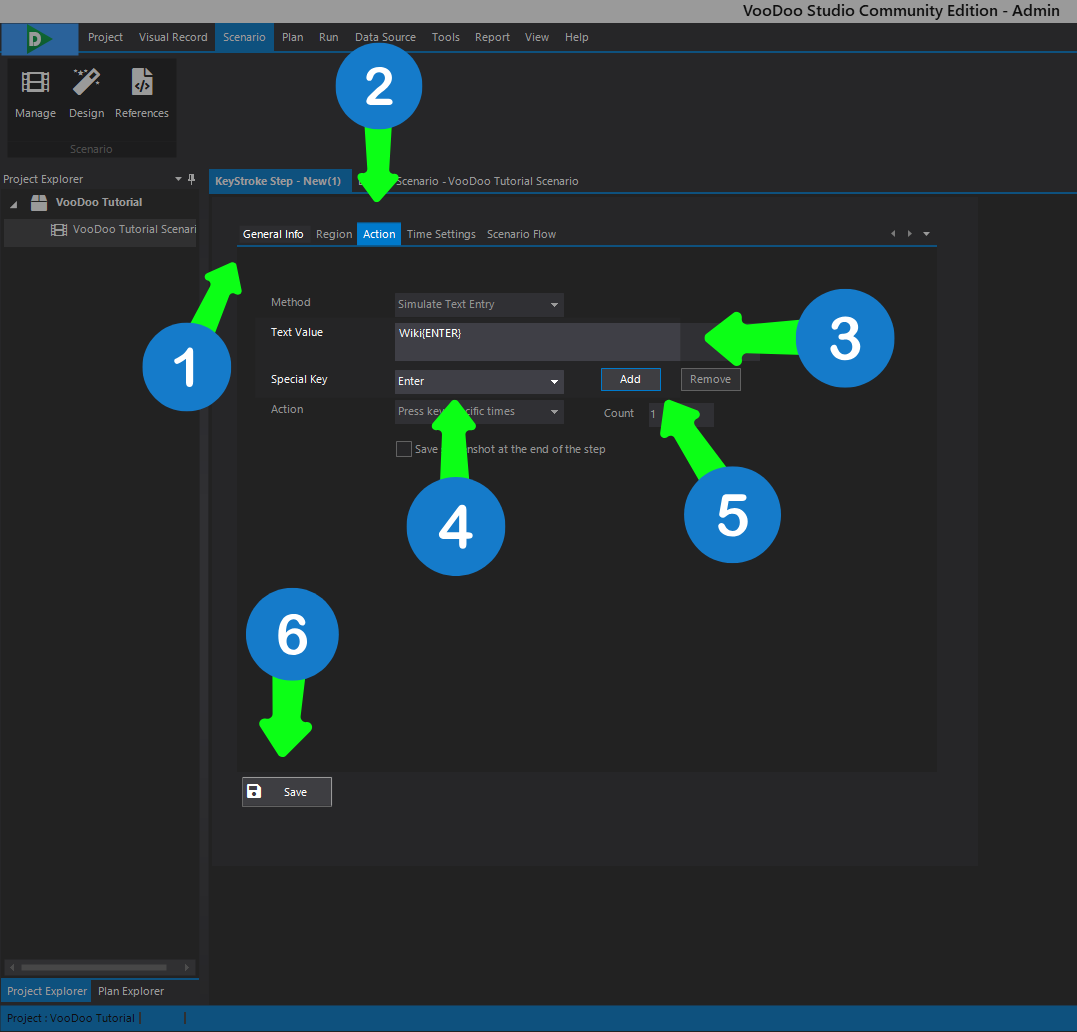
1) Name the current step using the General Information section.
2) Click on the Action option.
3) While the robot is running, we want the keyboard step to type Wiki, so we enter Wiki in the Text Value field.
4) Since we want the keyboard step to press “Enter” after typing “Wiki”, enter “Wiki” in the text area and select “Enter” from the Special Keys bar.
5) Click the “Add” button to add the Special Key to the Text Value field.
6) Save.
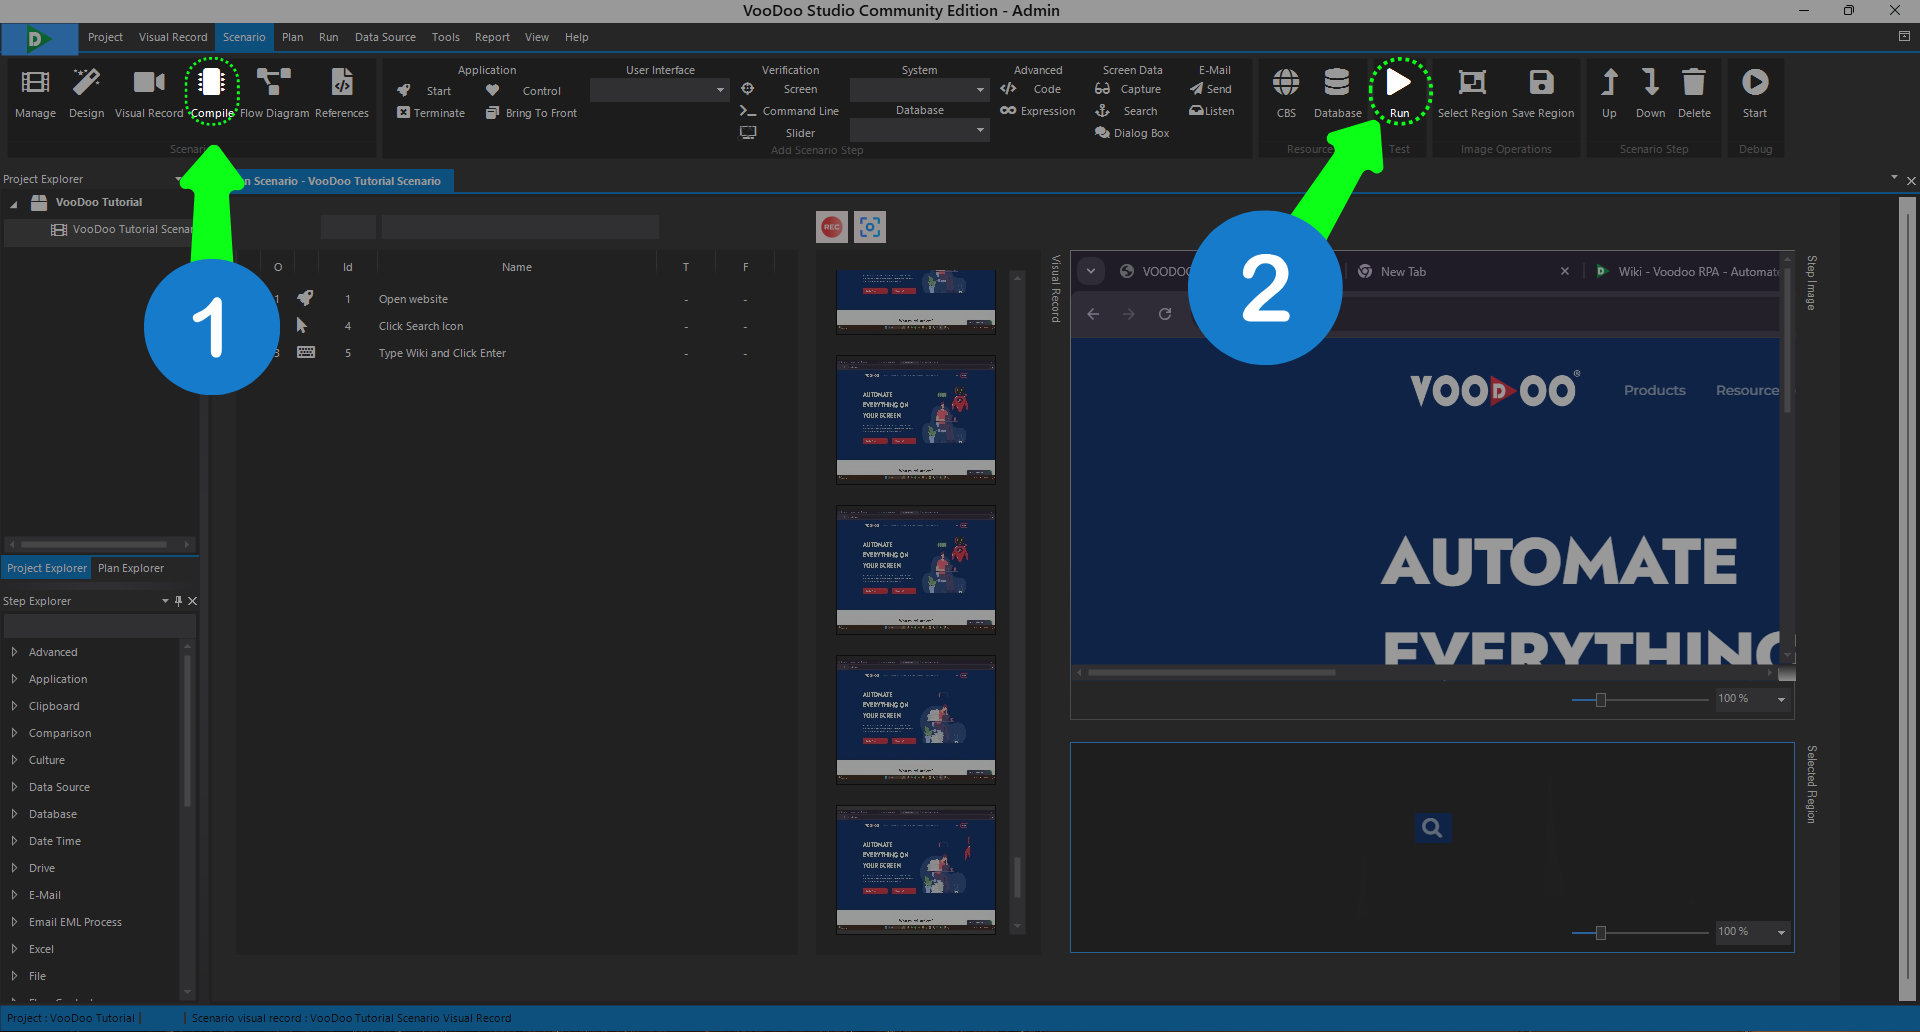
1) Since we used image processing in the scenario, compile the scenario.
2) After the compilation is completed, click the “Run” button to run the scenario.
We successfully created the keyboard step. Now we can compile and run our scenario.
